In here a collection of useful information on things that get asked frequently.
- What's the difference between PSX2PSP and PSN Eboots
- Why should i prefer PSX ISOs on emulators
- How to play PSX2PSP eboots on a PSP
- How to Emulate PSX2PSP eboots
- How to play PSN eboots on a PSP Console
- How to emulate PSN eboots
- How to play PS2 ISOs on PCSX2
- How to play Turbografx-16 Classics
- How to play PS1 games with an emulator on PC
- Why some PS1 games have multiple .bin "tracks" files and what should i do with them?
- What format of Dreamcast game should i download? CDI or GDI?
- How to change PSP/PS2 games language?
PSX2PSP Eboots vs PSN Official Eboots, what's the difference?
eboots are .PBP files created to play PS1 games on PSP consoles and later on VITA.
Some people also prefer them over PSX ISOs because it's just 1 file usually smaller in size, this last use is a really bad idea, i'll elaborate later. For now you need to know:
- PSX2PSP: Are eboots made by random people, usually with a program called PSX2PSP (there are others: Popstation GUI, IceTea). While most of this files work fine, many have issues (No sound, random crashes, disc change errors), and some don't work at all (black screen on startup).
- PSN Eboots: These are eboots sold at the official PSN store. They are perfect. No bugs. But usually emulators can't play them due to encryption.
Why should i always prefer PSX ISOs instead of Eboots if i use Emulators?
Over the years people have put a lot of effort into dumping every game making sure they are exact copies of the original media. Huge databases were created such as redump, advanscene, renascene, dat-o-matic, etc.
Redump is the group making sure every psx game is correctly dumped, we make an effort to get their verified versions because they have no errors.
When you convert those isos to eboots the iso is no longer a "good dump", all that precious work done is immediately destroyed. You created a random file with no value whatsoever that just happens to work (if lucky). It may crash at any time, no guarantees. While when using a verified PSX ISO you know for sure, any issue is an emulator issue and not your game.
Eboots exist to be played on PSP or VITA, not for emulators. They just happen to work. They are not meant for emulators.
How to play PSX2PSP eboots on a PSP Console:
Copy the folder containing the EBOOT.PBP to \PSP\GAME\, note that each eboot needs to be "in a folder", else they'll show up as corrupted data.
Example Path: X:\PSP\GAME\SLPS-02985\EBOOT.PBP
How to Emulate PSX2PSP eboots:
You shouldn't emulate eboots since they are added to play on PSP and VITA consoles, If you want to play PS1 games on an emulator then download PSX ISOs.
That being said, eboots labeled "PSX2PSP" should work on Duckstation, ePSXe, and maybe others.
How to play PSN eboots on a PSP Console:
Copy the folder containing the EBOOT.PBP file to \PSP\GAME\ without changing the folder name (the game ID).
Example: X:\PSP\GAME\NPJJ00231\EBOOT.PBP
PRO-C2 CFW has problems with PSN eboots use "PRO-C Fix-3".
How to emulate PSN eboots:
You can't. PSN Eboots are encrypted and meant to be played on PSP/VITA consoles.
You must not download PSN Eboots if you don't have the real hardware.
Download the corresponding PSX ISO version instead.
How to play PS2 ISOs on PCSX2 emulator for PC:
- Download and extract the game to a folder using 7-zip (free).
- Download and install latest PCSX2 (Use that link. The official site hosts an older version).
- Open PCSX2 and do System -> Boot ISO.
- Then Select the .iso or .bin file.
NOTE: ALL CD based PS2 ISOs are .bin files and all DVD based ISOs are .iso
How to play Turbografx-16 Classics
These games are different from regular PSP ISOs. They come with a DLC that is mandatory to be copied to the right place in order to make the game run.
On PPSSPP:
Go to your PPSSPP installation folder. Then \memstick\PSP\GAME
Copy the DLC folder included with the download inside the game folder.
On PSP:
Copy the DLC to the game folder like so: ms0:\PSP\GAME\NPJJ30040\
Also you must make sure you have enabled NoDRM. On PRO-CFW you do this by pressing select > Recovery Menu > Advanced. And in there Enable "NoDRM Engine".
If you are on a custom firmware that is not PRO consider updating to PRO. If you can't or won't. There is a plugin called "NPloader" that does the same thing.
How to play PS1 games with an emulator on PC
Duckstation:
- Download and extract the game to a folder using 7-zip (free).
- Download and install Duckstation.
- Run Duckstation, go to System > Start File and Open the .cue file (not the .bins)
ePSXe:
- Download and extract the game to a folder using 7-zip (free).
- Download and install latest ePSXe.
- Run ePSXe, Make sure that Options > CPU Overclocking is set to x1 (Important!)
- To setup the buttons go to: Config > Gamepads > Port 1 > Pad 1
- To start the game go to: File > Run ISO
- Then select the .cue file (always the .cue, never the .bin)
- When done playing press ESCAPE first to end emulation, then close ePSXe.
Why some games have multiple .bin "tracks" files and what should i do with them?
TL;DR: You do nothing to them, play using the .cue file as you should have been doing anyway.
Long answer: Track number 1 contains the game data, the rest of the tracks are audio tracks or CDDA (Compact Disc Digital Audio). They are songs, the game music. The .cue file (Cue sheet) contains a list of all the tracks, their number and position on the disc. You should always use the .cue file when emulating or burning to a disc. No need to do anything with the extra .bin!
- Why are there so many: Depends on how many songs the game contains.
- Why are they separated?: This is Redump's decision to separate the game data from the audio data of PS1/Saturn games.
- Can i merge them: You totally can. We prefer not to because then it wouldn't be possible to match the data track CRC with redump database. But if you want to:
How to merge games with Multiple .bin tracks:
Using binmerge: (command line)
This method is reversible (you can get the exact same tracks back after merging if wanted (same CRC).
- Get https://github.com/putnam/binmerge
- Put all bin/cue in same folder as binmerge.exe
- Open command line
- binmerge "name of the .cue" merged
- it will create a "merged.bin" and .cue for you
Using ImgBurn: (no command line)
- You need a virtual Drive software to mount the .cue like Daemon Tools Lite (Free) or similar.
- Mount the .cue file
- Now you need a software like ImgBurn (Free) or similar.
- Open ImgBurn and select create Image from disc. It will create a new single bin/cue set for you.
What format of Dreamcast game should i download? The CDI or GDI?
The Dreamcast didn't use regular CD's like the PS1 or DVD's like the PS2 but it's own format called GD-ROM as a way to stop piracy. Spoiler Alert: It didn't work .
GD-ROM's can hold up to 1 GB of data, this is more than what a regular CD-R can hold which is about 700 MB. So pirates had to get creative. They ripped, compressed/down-sampled the games so they can fit on a regular 700 MB CD-R. Using a program created by Padus called "DiscJuggler" they saved their rips with the extension .cdi
- CDI = Are RIPS of the original discs made by people. They have generally lower quality and can have bugs.
- GDI = Are the original Discs. They are perfect 1:1 copies, no bugs, nothing is ripped.
Yes, all this is amazing but which one do I download? It depends...
- Download GDI:
-If you will emulate the game using any Emulator for PC, Android, etc.
-If you own a Dreamcast that was modded with an ODE (Optical Disc Emulator) such as GDEMU. - Download CDI:
-If you own a Dreamcast that was modded to play CD-R and you will burn the .cdi to a CD.
How to change PSP/PS2 games language?
For some reason some PSP and PS2 games don't have a language selector in game. That doesn't mean that the languages aren't there. What you have to do is to set the system language (BIOS language) to the desire language and only then start the game, making sure you are using full boot.
NOTE: This is ONLY for games that do DO NOT have a language selector inside the game. If it does use it.
- On PPSSPP: Game settings > Language
- On PCSX2:
1. CDVD > Set to "NO DISC".
2. System > Boot Bios
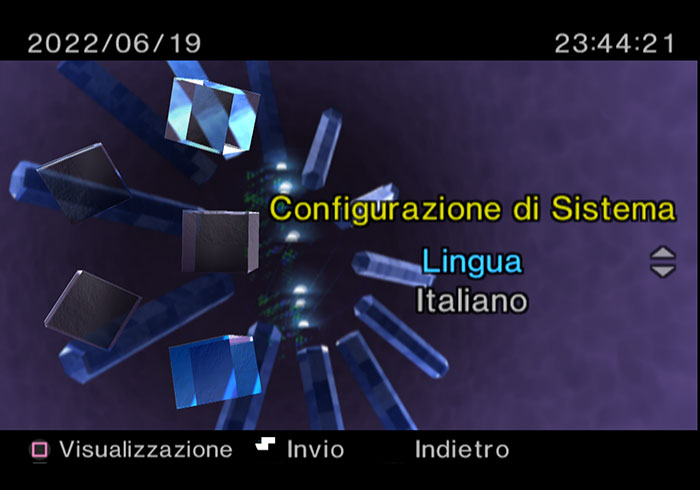
3. System Configuration > Language (see image below)
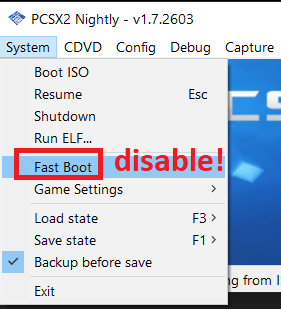
4. Then when you start the game use "Boot ISO (FULL)" (Not fast! see image below)
If after doing so you find the language didn't change, contact us. Language information is accurate, but not perfect.

